“Overall impression from the Biden press conference: it was well staged but I’m not sure they made a good choice by going open casket.”
— Margot Cleveland, still at large, for nowTime, Temperature, Foaminess
Okay, even though I bought the foam-as-a-service frother, I decided to go under the hood and record the precise behaviors and results of the various settings included with the Nespresso Barista Recipe Maker. In a spreadsheet, because that’s one thing they’re useful for.
Given the caloric potential, I’m only doing one or two recipes a day. The nominal capacity of the device is 100-250 ml of liquid, 30-90 grams of ice, and 15-40 grams of solids (chocolate squares, in the supplied recipes), which will be optionally heated and whipped into some mix of liquid and foam.
On some settings, it will detect a lack of sufficient liquid, and demand more before continuing. For instance, 60ml of milk wasn’t good enough for the Cappuccino setting, but 70ml was. But the Affogato setting calls for only 40ml of coffee and nothing else, and works fine. Clearly my spreadsheet is going to need a few more columns.
Since it uses a magnetic stirrer, I’m guessing the “add more liquid” warning is triggering on excessive vibration, which offers another testing possibility, and another column.

Isekai: 2.7
Angel moved toward her slowly, talking in a low, soft voice, like she was trying to rescue a lost kitten. Which she was.
“No, honey, you’re not. Virginia’s the big one who liked to break our toys. Do you remember her? Do you remember me?”
The catgirl moved so fast my heart stopped, but it wasn’t an attack, it was an embrace. They clung together for a long time, and then Angel took her hand and firmly pulled her over to me. I did my best not to look like the kind of guy who’d hit a girl, even one with fangs and claws.
“This is Jack, my very close friend. Like you. He was alone for a long time before I came here, because Virginia left him behind like a broken toy. He named me Angel.”
That wasn’t quite the scenario we’d been discussing recently, but there was certainly some truth to it. Not that it mattered, because her ears and tail had shot up at the word named. She looked up at me with huge, hungry eyes, like I was holding a fish just out of reach. Seriously, it was adorable, but I could feel Angel’s eyes as well, a quiet pressure begging me not to screw this up.
“You’re close like sisters, and you move like the wind. Would you like to be ‘Ariel’?”
Catgirls don’t hug, by the way, they glomp.
To be honest…
Apple QA: "Paging Little Bobby Tables"
True or false: Apple has locked Rachel True out of her iCloud account, for months, because her last name, when written in lower case, is getting parsed as a boolean.
Rachel, if you ever meet Robert Root, do not marry him!
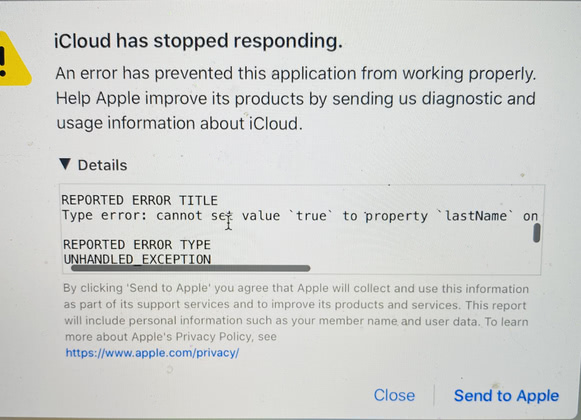
…or Doug Core; I still remember when the OSU-CIS help desk got the
request to fix his email. It said he always had new messages when he
logged in, but it was always garbage: /usr/spool/mail/core
Isekai: 2.6
“I’m pretty sure this one isn’t her. Or you.”
I winced as Angel bandaged the bite on my shoulder. I’d managed to avoid the claws somehow.
“What, you think we don’t bite?”
I was pretty sure she wouldn’t appreciate any details about what she had done with her teeth, or with her…
“Oh, hell, the pronouns are giving me a headache. Does she have a name, or can we give her one just so I can keep it straight in my head?”
She snorted as she finished patching me up, and started listing off possibilities. “Bitch, Slut, Witch, Wackjob, …”
“Cruella, Satana, Sinistra, Sextina, …”
“No, I think she’d like those.”
“Virginia.” Our eyes met, and our grins widened into laughter. She’d hate it.
“am… i… virginia…?” A quiet, halting voice came from behind me, and I turned to find our newest redhead peeking out from behind a tree. She looked frightened, and I remembered lashing out with a fist when she’d jumped us from behind the rock and sunk her teeth into me.
She was tiny, maybe a foot shorter than Angel, who’d recently shot up to about five-foot-six. It wasn’t a child’s body, though; she was a perfect miniature woman, with gentle curves covered by short, rust-colored fur.
Yeah, we’d come home and found a stray catgirl on the porch, complete with ears, tail, and the same face as every other redhead I knew.
Make America Grow A-pair
It’s too late to create a Cancel Culture Bingo Card; they shut down the Senior Citizens Center a year ago. And Cuomo shut down the senior citizens, permanently.
“They can have my Green Eggs when they pry it from my cold, dead Hams.”
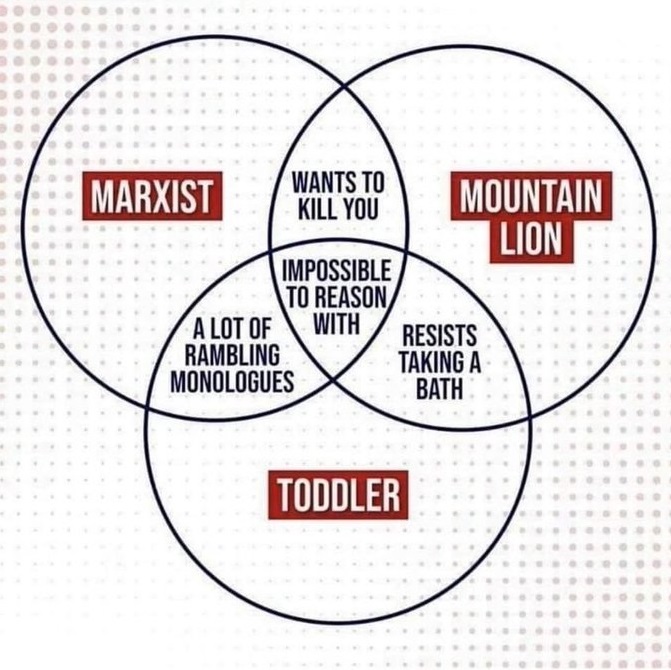
Honestly, I have trouble telling the Marxists and the Toddlers apart these days.
“When guns are outlawed, only outlaws will have The Cat In The Hat.”

The only thing Heinlein got wrong in “If this goes on…” was the name of the religion that would destroy freedom in America.
Isekai: 2.5
“I kind of liked the hero thing.”
She grinned, then hugged me again to soften the blow to my ego.
“I think she found a hero. Here, on that rock, pulled across by a real Power, but left unwatched and unguarded. She staked her claim, then used the connection to shift back along your lifeline and take the credit. That’s something we can do.”
Remembering precisely how we’d been connected when I arrived, I looked down to find Angel blushing furiously.
“When we’re older. So I’ve heard. Change the subject, please.”
“So you think she was, what, poking around in there’s dusty little corners, and stumbled across something she could use?”
“Exactly. And that rock is the way in. It’s where she found you, it’s where you found me, and it’s where we’ll find her.”
Would you believe we found another redhead waiting to pounce on us?
StandardNotes: sync fail!
Isekai: 2.4
I think most people carry an image of themselves that’s out of date. Younger, healthier, still able to fit in those pants, things like that. Me, I was a 26-year-old pizza guy who’d been chasing 20-year-old college girls until he caught the wrong one and ended up here. Twelve years ago.
“It’s not like we own a mirror, but I see my reflection sometimes, and I look older, more like my dad.”
“Because you know you’re supposed to. You came from a place where it happened to everyone, so you expect it. I didn’t, so I don’t. And you’re not.”
I carefully pushed her away, just enough to look in her eyes. She believed it, and it scared her a little.
“What if it’s not here being there, but me being here? How I got here. How I… died.”
I hadn’t thought about her much since Angel arrived, but she’d been very focused on my death, even if she’d gotten the date wrong. And she’d said she brought me back.
“I don’t think she has that kind of power. We’re not, well, for that, and it’s always bothered me about your story. Whisking a man away at the moment of his death to hump him back to life as a hero, like some kind of slutty valkyrie? Not a chance; she probably got that story out of a comic book.”
Thinking about her story
Isekai: 2.3
Angel was always trying to make our exploration more effective, so it surprised me one day when she said, “I think we need to go back.”
We’d been together for about two years, moving steadily away from the cave in a widening spiral, learning about our world and each other. I stopped picking fruit and gave her my full attention.
“I think we’re looking for the wrong thing. Or the right thing in the wrong way.”
“I tried smoke signals once; nobody turned up.”
My weak joke earned me an expected weak smile and an unexpected big hug, which lasted long enough to remind me that she was growing up fast. If at ten she’d looked twelve, at twelve she looked fifteen, but I was saved from further fifteen-will-get-you-twenty thoughts by her next words.
“I don’t think this world is real. I think it’s part of there.”
“I don’t understand. If we’re there, how come you’re getting older?”
“How come you’re not?”