Tools
Five-Star Deathmatch: The Movie
Okay, now that I have a (half-dozen implementations of a…) well-tested image-ranking Python script, how do you use it?
-
Download deathmatch.py
-
Install Flask:
pip install Flask -
Run the script with a single argument, the name of a directory full of PNG and/or JPG images:
python deathmatch.py /Volume/galparty/freshand open a browser window to http://127.0.0.1:5000, You should see a status bar at top, the first image in the directory by modification time, a help button in the upper right, and two rows of buttons at the bottom.
-
The first row of buttons are rank. All images start at 0, and can either be promoted by pressing 1-5 or rejected by pressing X. This will update the matching buttons at the bottom and advance to the next image.
-
The second row of buttons are flags. One or more can be selected by pressing A-F; this will not advance to the next image, so you can flag a picture before ranking it. Flags mean whatever you want them to, and are there so you can easily mark images that are interesting for reasons other than quality (“family”, “funny”, “disturbingly similar to that girl from Frozen”, etc). The far-right button matches images that do not have any flags set.
-
Clicking on any of the buttons excludes matching images from the display.
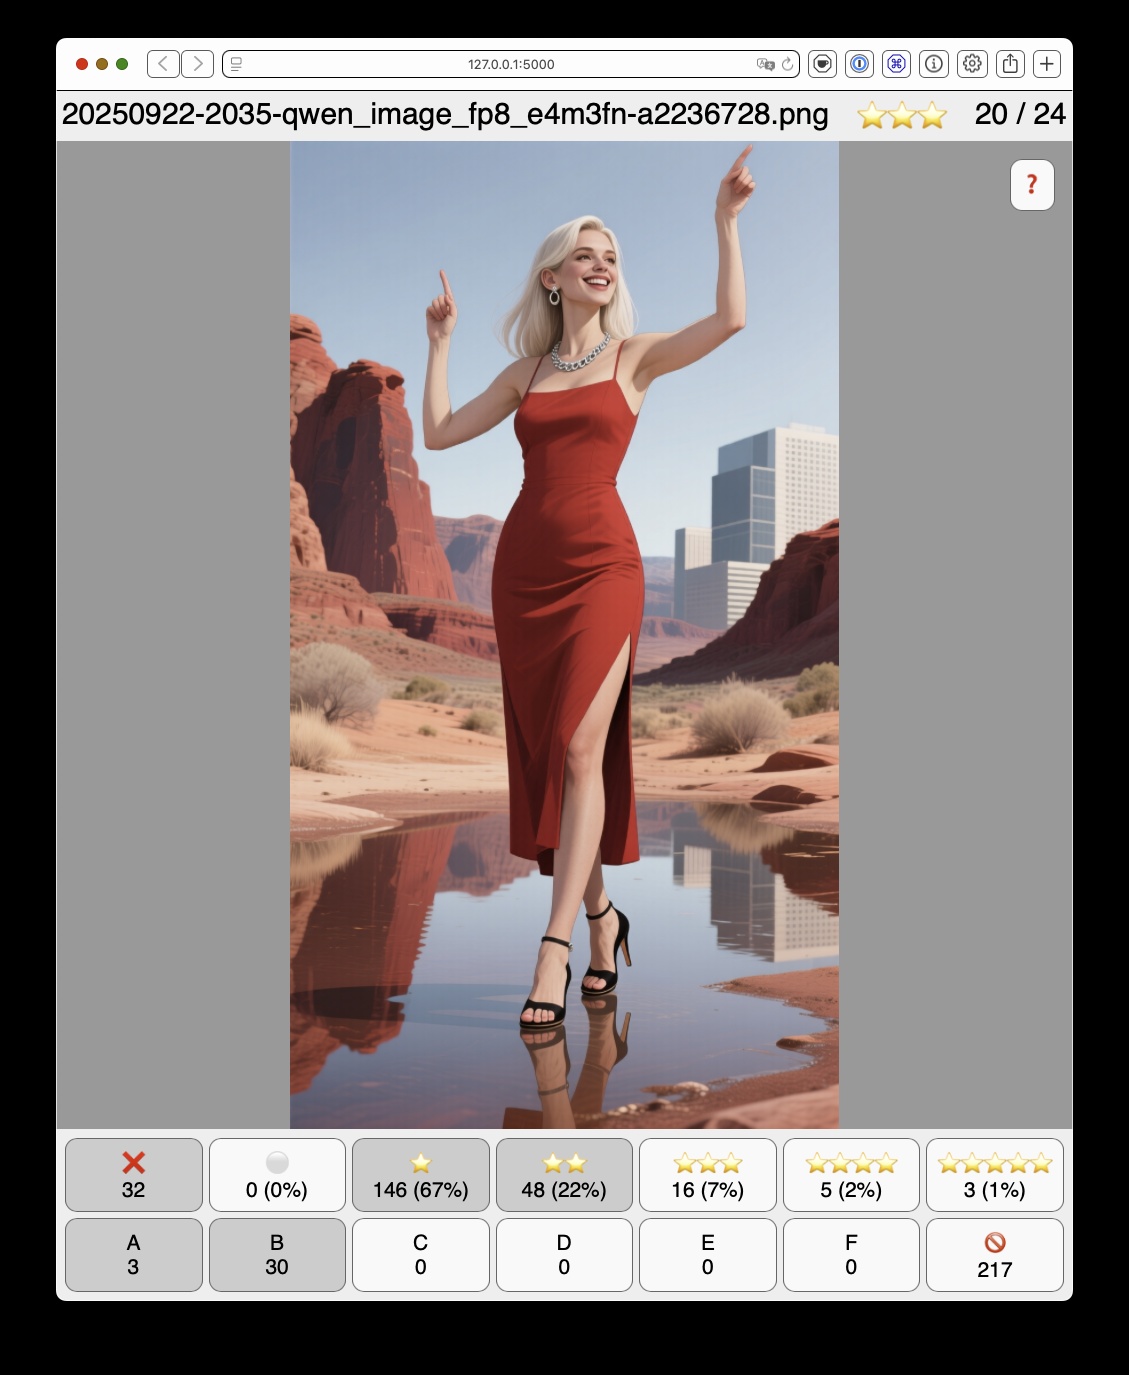
(pretty sure there’s no giant office complex in Red Rock Canyon…)
Ranking and flags are stored in the same directory in a file named
_rank.txt. The fields are separated with tabs. This file is updated
every time you change a rank or flag, so your progress is
automatically saved.
Running a deathmatch
-
Run the program in a directory full of images and click each of the following buttons: X, 1, 2, 3, 4, and 5, filtering the list to show only rank 0 images (all of them the first time).
-
Starting with the first image, press either X or 1. Make this a very quick pass that just takes out the trash. Out of focus, picture of lens cap, shakycam, AI gal with three arms, etc. When you’re done, you’ll have no images left at rank 0.
-
Click the 0 and 1 buttons, so that only rank 1 images are displayed. Make a pass across all rank 1 images, promoting exactly one-third to 2. The easiest way to do this is just have your fingers on the 1 and 2 keys rather than using right-arrow to skip the 1’s. Be brutal; you’re picking your best. If a picture is interesting, flag it with A-F.
-
(Optional: walk away for an hour or a day, and come back fresh) Adjust your filters and make a pass across all rank 2 images, promoting exactly one-third to 3.
-
Rinse and repeat two more times, until 1/81 (1.2%) of your original rank 1 images are ranked 5.
Since this isn’t a full photo-management app, there’s no convenient
way to package up your selected pics for printing or editing, but you
can copy-paste the filename from the top-left corner, or make a copy
of the _rank.txt file and edit it down to just the ones you want.
[Update: I cleaned up the code and added a simple export: press L to copy the current visible list to the clipboard, one per line]
There are five six additional commands available:
- Up and Down-arrow, to take you to the beginning/end of the list
- Z for zoom, to see images at full size with scrollbars
- R for reset, to turn off all active filters
- L to copy the list of visible images to the clipboard
- SPACEBAR to reload the image list from the directory, in case you’ve got an AI actively generating images in the background, as one does.

Unrelated,
The new Dr Seuss LoRA for Qwen Image doesn’t really work for illustrating Red Sonja.

The $LICENSED_TOOL ‘AI’ Coding Experience
I fed it the spec, and it created a multi-file project, with a
separate HTML template file, a cleanly-formatted README.md
containing a quite reasonable summary of the purpose and function of
the program, a requirements.txt file containing the dependencies,
and a Python program that worked on the first try.
In testing, I identified four issues: two of them were arguably ambiguities in the spec, the other two were related to correctly displaying images larger than the window. After checking in the initial version, I went through the “approve changes” dialogs, where it showed me each change in a clear, clean diff. The resulting code passed all my tests.
For the third pass, I told it to package the whole thing up for distribution with the Python Poetry toolkit. It did. I’m done.
I did not allow $LICENSED_TOOL to run commands, even git checkins (which other IDEs can do without handing over the reins to an AI), because I’m not stupid. Still, the experience was so much better that I’d consider paying the $15/month fee if I had a lot of projects just lying around waiting to be written.
This is my shocked face; there are many like it, but this is mine:

(I’m not nearly this fat, and I haven’t had a sugared Pepsi in over a decade; the rest is 100% accurate 😁)
The gals show plenty of diffusion bleed; the pin-ups are human gals with “cat ears and cat tail” (because “catgirl” makes disturbing furries), and the t-shirt gal is just an elf, with no mention of an apparently-detachable tail. It took several tries to get even one pin-up gal without elf ears.
Codellama-34B
I was chatting about this at work after sharing my positive experience with $LICENSED_TOOL, and someone asked DuckDuckGo which offline coding LLMs to use. It recommended WizardCoder and two variations of Codellama. I grabbed the largest versions of them (~34GB each on disk) and fed them the spec.
Codellama wrote me a short story about how it would write the program. Just the story, no code.
I followed up with “write the program”. It wrote a sequel to the story.
I followed up with “where’s the code?”, and its answer was, I shit you not:
I uploaded my code on Github as well - https://github.com/akshat-raj09/CMPE15M_A3
I’m gonna need a bigger shocked face.

(also, those models all have a maximum 16KB context limit, so even half a dozen passes will blow it out; deleted)
Unrelated,
Amazon’s recommending bibles this week. Gosh, what could have happened recently that shifted the algorithm? Like the motives of a left-wing Antifa terrorist who was fucking a furry tranny, I guess we’ll never know.

Even more unrelated,
I was briefly deeply disturbed by the Chinese furniture manufacturer that has chosen the brand name Goaste. Read it wrong the first time…

Dear ANN reviewer,
I really don’t care about your trans journey, or how you feel it was reflected in the final episode of Call Of The Night 2. Allow me to introduce you to the concept of TMI.

Batch Gals
SwarmUI’s wildcard support isn’t completely random. Buried in the “Swarm Interal” section of the parameters is the “Wildcard Seed Behavior” param, which defaults to “Random”. Changing it to “Index” will loop through the wildcards file in order.
So I used my latest wildcard set to generate 250, piped that through the LLM prompt enhancer, and turned it loose.
Not all of the fails were due to the enhancer. Missing limbs and off-by-N finger counts are old hat, so let’s stick to novel fails.
3D coffee update
I designed two new replacement tops for the Essenza Mini Mug Drip Tray, so I could leave it attached full-time and just replace the top when I want to switch from espresso/cappuccino cups to giant mugs. As a bonus, the tall piece sits nicely on my Keurig Elite as well, adding enough height to cut down on splashing while still holding my largest mugs stable.

The tall cover piece is a bit larger than the short one, so that it’s
wide enough for my largest mugs when used on the Keurig. Both should
provide a slight lip, but I’ve found that the slight roughness to the
print surface adds enough friction to counter the vibration. I
replaced my hacked-together drip hole with the nice teardrop() shape
from the BOSL library. It fills
the space nicely and looks cooler. I also went with a smaller number
of larger holes, to reduce the amount of flex. Everything’s still
designed for printing with 0.3mm layer-height, of course.

Update
Should be a published thingy now.
Joplin hack!
The CLI client for Joplin is very limited in functionality. It’s good for import, export/backup, and some very simple note-manipulation, but that’s all.
The mobile clients are mostly functional, provided you want all your notes sorted by title, created date, or updated date across all notebooks (per-notebook settings are a concept yet to be implemented on any client). The concept of dragging notes into a specific order is only supported on the desktop client.
…unless you’re willing to cheat, which I am. Using the plugin
API and code cribbed
from the Combine Notes
plugin, I
wrote a tiny little plugin that modifies the titles of the selected
notes so that they are prefixed with a string of the form “001# ”,
replacing any existing prefix. So, if you select all the notes in a
folder that you’ve arranged in a custom order, then when they
replicate to a mobile client, title-sort will preserve your order.
I’d make it a lot more robust and customizable before publishing it as an official Joplin plugin, but it meets my needs, and if anyone else thinks they’d find it useful, here’s Custom Order Titling.
import joplin from 'api';
import { MenuItemLocation, SettingItemType } from "api/types";

function zeroPadding(number, length) {
  return (Array(length).join('0') + number).slice(-length);
}

joplin.plugins.register({
  onStart: async function() {
    await joplin.commands.register({
      name: "CustomOrderTitling",
      label: "Custom Order Titling",
      execute: async () => {
        const ids = await joplin.workspace.selectedNoteIds();
        const prefixRegexp = /^\d{3}# /;
        if (ids.length > 1) {
          let i = 1;
          for (const noteId of ids) {
            const note = await joplin.data.get(["notes", noteId], {
              fields: [
                "title",
              ],
            });
            let strippedTitle = note.title.replace(prefixRegexp, "");
            const newTitle = zeroPadding(i,3) + "# " + strippedTitle;
            await joplin.data.put(['notes', noteId], null, { title: newTitle });
            i = i + 1;
          }
        }
      },
    });
    await joplin.views.menuItems.create(
      "contextMenuItemconcatCustomOrderTitling",
      "CustomOrderTitling",
      MenuItemLocation.NoteListContextMenu
    );
  },
});
Two caveats:
-
I believe that the sync works on the complete-note level, so that updating even a single field like title replicates the entire note, but only the metadata and body text, not any attachments.
-
The order that you build up your selection of notes is the order the plugin will see them in. So, if you were to add them to the selection in random order, then the prefixes will be generated to match.

Turning customers into products...
I own exactly one wifi-connected wall plug. It controls the hot-water recirculation pump, so that it doesn’t just run 24x7, and it’s also Alexa-reachable if I want to turn it on mid-day.
This week, when I opened the associated app, it announced that real soon now it will require an account to continue working. Which means that WeMo wants to start collecting data about me to sell.
Which means that I’ll be e-wasting this product the moment that it demands I login for security updates or continued functionality.
Unrelated,
I installed the new version of MalwareBytes on my MacBook Air. It activated a trial of their premier service with real-time protection.
Not only did the palm-rest area of my laptop get quite warm, it caused
the pyenv shim command for python to take several seconds to run.
Since I use python --version to help set my shell prompt (letting me
know if it’s 2, 3, or some virtualenv), this was immediately quite
painful.
Suddenly I do not want to become a paying customer…

Dulling the shine
One for Rick C…
Overture PLA Plus/Pro is giving me a much less shiny top surface, at least in the dark blue (love the color, by the way).
Related, while using my heat gun to de-string a print, I noticed that it did a nice job of slightly dulling the extremely shiny finish that I get on the bottom from printing on glass+hairspray. I had it set to 350°F with the fan on high, and kept moving and rotating the parts to avoid melting anything thicker than strings.
Note that this is unrelated to the use of heat guns to restore smooth plastic finishes, which involves reducing the impact of UV and oxidation damage without sanding/polishing off the surface layer.
Oh, and What was I printing? A bag clip, of course. 😁
More specifically, this stl, scaled up from this clip by a designer at Prusa. I found the original wore out too quickly when used to secure twice-folded-over coffee bags, so I scaled it up (a bit more XY, a lot more Z) and printed at 0.3mm, with 5 walls so it printed solid without any infill pattern. The (quite mild) stringing came from testing Cura’s “smart hiding” of layer-start positions with a spool of filament that’s a bit thicker than the nominal 1.75mm.

(picture is unrelated)
Don’t Be A Tool
In the grand tradition of using your 3D printer to print 3D printer accessories, quite a few people have designed little stands to hold all their 3D printer tools and published them to the various “search” sites. With few exceptions, they suck.
Common problems include:
-
I need seven inches or more: requires at least 180mm in at least two dimensions. My printer’s build area is 255x155x170.
-
Carve away anything that doesn’t look like an elephant: designed as a solid block of plastic with small holes for tools.
-
If your love life requires close air support, something has gone very wrong: requires significant supports to print successfully.
-
Hours will seem like days: all of the above contribute to ridiculous print times.
-
Where does the third one go?: assumes specific workspace layout (wall-mount, pegboard, attaches to one model of printer, etc).
-
One ring to rule them all: very-specifically-sized slots for every tool you could possibly need, not just the ones you actually use regularly.
There’s a pretty reasonable one designed specifically for the Dremel 3D45. Except for the part where it mounts to the right side of the printer, which isn’t where I use any of the tools.

File this one at Cults3D under “baffling” (even though it would fit nicely on my printer), because it has prominent storage for seven spare nozzles. Why? Not even “why do you need seven nozzles”, but “why do you have them all out on your workbench gathering dust in unlabeled bins?”.
Right now, I don’t want to print any of them, and I don’t want to spend the time to design my own, so my tool holder will continue to be a $5 box from Michaels. Maybe I’ll make a little organizer insert for it sometime, but honestly, I pretty much just use the scraper, flush cutters, emery boards, and a small sharp knife, and those fit on the lid of the box, with room left over for the calipers.
66%の誘惑
Next time, Nancy, maybe you shouldn’t buy your souvenir pens from China…
, サリー(防振り), 毒竜(防振り)")
"That's the trouble with godhood: it robs you of your finer
judgement. A deity so rarely has to pay for his mistakes!”
"...while heroes... heroes have an infinite capacity for
stupidity! Thus are legends born!”
Nearly Topless
Thickness
I renamed my Cura 0.35mm layer-height preset from Coarse to Thick, because the Custom Printjob Naming plugin tries to abbreviate quality names to their initial letters, and if I have to choose between coarse and chunky, I’ll take chunky (this is not dating advice, but it could be). That makes the full set UAHGMOLTSC, which proves that I’m CACA (Crap At Creating Acronyms).

Mal-Adaptive
It seems Cura’s adaptive layer-height mode is experimental for a good reason. I printed a folding tablet holder that’s a good test of how well you’ve dialed in your filament settings, and it had a bunch of small holes in the top flat surfaces. Why? Because Cura calculated the number of top layers required for a 0.8mm surface based on the nominal layer height of 0.2mm, but because of nearby curved elements, printed them at 0.05mm instead. Four of those doesn’t make much of a surface. The stand is fully functional, just a bit moth-eaten on top.
This explains some other minor flaws I was running into with this feature, so I’ve stripped it out of my config set for now. UHGMOLTSC.

Dremelizing Cura, Chainsaw Edition
Here’s a tarball of my first pass at completely overhauling these Dremel 3D45 Cura configs. In order to test them side-by-side, I changed the vendor name in all the references from “Dremel” to “DR”.

The most frustrating aspect of creating this set was that when Cura
barfed on my configs, all it said in the logs was “Error when loading
container: ‘int’ object is not iterable”. Nothing useful like the
specific file or line number. The actual error is: machine definition
files can only have values in the form {"default_value": ... } or
{"value": ...}. I had copied actual values out of the material and
quality files as part of my effort to maximize the use of inheritance
and calculated values. And that’s a half-hour of my life I want back.
My primary motive for building these was being able to adjust acceleration, jerk, and speed, and have all the other related values get calculated relative to them. Dremel’s original configs didn’t do this, and the linked Github repo is pretty much copied directly from those, with ongoing cleanup.
My secondary motive was expanding the list of recommended quality settings. I’d added a bunch of different layer heights (0.15, 0.25, 0.35, 0.4, and adaptive), but they didn’t show up in the top-level menu; I always had to go into the custom view to select from them, and then I lost the convenient UI for infill and supports. Defining a whole new printer with custom settings fixed that, and also automatically keeps overrides (like z offset) when I switch settings.
As part of the fun, I tried to come up with names for the various quality settings that matched the scheme Dremel used. Theirs were Ultra (0.05mm), High (0.1mm), Medium (0.2mm), Low (0.3mm), and High Speed (0.34mm plus some speed overrides). I added Good (0.15mm), Okay (0.25mm), Coarse (0.35mm), Chunky (0.4mm), and Adaptive (0.05-0.35mm). All of them inherit my revised acceleration/jerk settings, so the estimated print times are within 5%.