Kumihimo
Parametric Takadai design

There are three basic methods for acquiring a takadai: buy, build, or kludge. They’re sufficiently uncommon that the only US retailer has an 18-month waiting list, and the two widely-available construction plans (Owen and Franklin) are for small, portable units. I have both plans, and I don’t like either one. Why not?
"The opening between the lower rails was designed so that a braider with a shoulder width of approximately 15.50 inches is able to work without leaning forward or pulling in the elbows, so that back strain is minimized." --- Carol Franklin
Franklin’s design puts the space between the rails at 18 inches, Owen’s at a bit over 16. My ribcage is 18 inches wide, so using one of these designs as-is would be like flying coach in the middle seat between two football players. It’s not gonna fly.
The two “standard” sizes available in Japan have roughly 22 and 28-inch openings, but they’re designed with a built-in kneeling platform, not a comfortable position for most Westerners. They’re also pretty darn big, with the largest one measuring 110x100cm (43.3x39.4 inches).
I don’t want to spend $650 and wait a year and a half for what is admittedly a piece of fine furniture, but I also don’t want to fly coach, so it’s time to design my own. I learned a lot from the kludged-together Bakadai, and since I can’t use the Owen/Franklin plans directly, I’m free to question every detail of construction. I’m working in OpenSCAD to make the numbers easy to tweak, and my current design (pictured above) is here.
Tsune-gumi on the Bakadai

15 inches high, 26 inches wide, 16 inches deep. These are terrible dimensions for a Takadai, but they work pretty well for an idiot’s makeshift version: the Bakadai. The braid is coming out nicely, at least; it’s 25-strand Tsune-gumi (3/3 twill), done with a single strand of cheap medium-weight acrylic yarn per bobbin, in a simple zig-zag pattern.

I’ve had to rebuild it several times already, as I discovered where the stresses were (version 2 included a 4-kilo kettlebell for stability…). The latest version added sandpaper on the takeup bar, to keep it from unwinding the finished braid every time I pull the shed open to pass a bobbin/shuttle through; a real takadai uses a ratcheting mechanism, but I didn’t have one laying around the house, and the only tool I’ve used so far is the saw blade on my Leatherman, to cut the dowel to size.
The key components are the 8 sliding koma and their frames, which are constructed out of two sets of the Martha Stewart Knit and Weave Loom Kit, which I found on sale on Amazon for $20. Side note: I couldn’t get it to work well for weaving or single knitting, but I did make a decent double-knit scarf before I tore it apart to use for takadai parts. It’s a decent kit, but much better at $20 than the current $33 or the retail $45.
The other parts are a cheap lap scroll holder from a craft shop, a three-tier sword stand that I don’t need while my swords are off being polished, two short lengths of dowel, a bungee cord, a “bone” folding tool, a chopstick, three little strips of sandpaper, some gaffer tape, and some rubber bands and string. And a bunch of weighted bobbins, which I already had from my Marudai.

(note that the uneven thread spacing and the camera angle make it look like I’ve only got 2 threads under the chopstick at one point; there are actually 3 there)
Technical limitations:
- held together with string and rubber bands, so not the most robust thing in the world.
- hard to set up at a comfortable height; currently it works best standing.
- the front bar of the scroll holder is always in the way.
- each koma only has 5 pegs, so I'm limited to a maximum of 15 strands per side.
- the angle from front to back is way too steep (about 20°).
- it's too small to use my hand to create the shed, so I'm using a chopstick.
- the scroll frame isn't deep enough; another 6 inches or so, and I could use the biggest parts from the Martha Stewart loom to create a much longer frame for the koma to slide in, and use longer pieces for the koma, allowing me to increase the number of strands and even out the spacing between them.
- the sword stand is too close to the scroll holder. On the plus side, it's close enough that I can use the takeup bar to hold the chopstick in place while I pass bobbins through, which makes it feel more like using the real thing.
- only one set of koma on each side, so it's limited to single-layer braids. Not that I'll be ready to try double-layer braids any time soon...
If version 6 holds up well, I won’t make any significant changes to it [okay, there will be at least one more version; the sandpaper isn’t quite enough to keep the weight of 25 bobbins from gradually unwinding the takeup bar]. Instead, I’ll focus my efforts on designing parts with OpenSCAD to be milled on a Shapeoko 3 in the Spring. I have two sets of plans, from Rodrick Owen (with errata) and Carol Franklin, and my experience with the Bakadai has already given me a few ideas that will simplify the milling.
The first thing I build will be a better-proportioned Chibi-Takadai and a set of smaller bobbins, with only the top sides milled to keep it simple. The bobbins will have to be done in two parts and glued together (with washers for weighting), and the koma will have to sit at an angle rather than running in a track; that works well on the Bakadai, and will be even better with purpose-built parts.
[Update: for version 7 I replaced the takeup bar with a 1-inch dowel, the largest size that just fit inside the rubber hooks of the bungee cord. The tension is perfect, and it didn’t unwind at all when I made another Tsunegumi braid. The only remaining modification I need to do is put longer leaders on my bobbins.]
The 3,855 Interlacements of 17-strand Shigeuchi
No, I’m not actually going to include all of them. Not only would that be worse than visiting an endlessly-scrolling Tumblr full of animated GIFs, the vast majority of them are just plain ugly. In addition to the Carey diagram, I’m just going to post six reasonable ones and six random ones, to give you an idea of what’s available.
I’m not going to try an exhaustive search on 25-strand Shigeuchi; 2^17 was bad enough…
[Note: these diagrams are not compatible with ee0r’s 17-strand taka-on-maru braid, which looks pretty much the same, but obviously has a different braiding sequence. Mine is described at the end of this post, and I’ll do a real step-by-step with pictures later.]
9-strand Shigeuchi (繁打九つ組)
The most common sageo (mounting cord) for a katana is a 9-strand braid normally done on the takadai, but instructions for making it on a marudai are here (my own instructions on how to make it on a foam disk are here, in abbreviated form). After a little practice (and the acquisition of a set of 240-gram tama), I made a quite nice one for my primary iaito, using DMC embroidery floss (6x 4-meter strands) to get just the right color combination. It’s extremely quick and easy, especially if you follow Tada-sensei’s pictures and lift two tama at once.
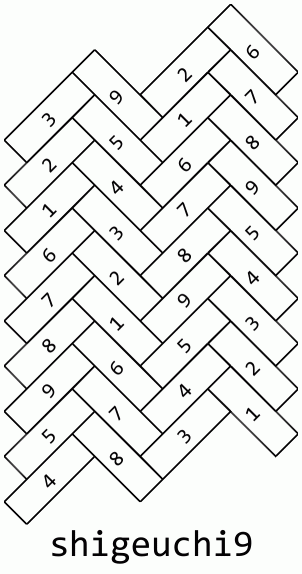
Commercial Shigeuchi sageo are only found in two styles, solid and 2-strand zig-zag (221111111). The reason for this is that most of the other interlacements kind of suck. Shigeuchi is an oblique 2/2 twill pattern, and the progression of strands across the braid is much more regular than most kumihimo braids. Here’s the Carey diagram for the front side (the back is just a 180° rotation):

As you can see, every strand follows the same ordering in every column, severely limiting the possibilities. In fact, the standard “clockwise from the top” numbering system obscures the regularity a bit; if you numbered the five strands on the right 1-5 from the top, and the four on the left 6-9 from the top, the numbers in the above diagram would all be in order, which quickly became obvious in my 9-color test braid.
Viable three-color patterns are even harder to find, and the only three I’ve found that are worth mentioning are 111113322 (double zig-zag), 113323332 (crossing double-zig-zag) and 111223332 (sort-of triple-zig-zag). I’m sure there are others, but my script didn’t do a good job of reducing the search space, leaving me with 674 GIFs to pick through.
Fast Rope, Tassels, and Speaker Wire
The basic four-strand round kumihimo braid, Maru Yottsu, is a quick and easy way to create a strong braid with simple color patterns.
It’s not a Japanese invention, however, since pretty much every culture in the world figured out how to braid four strands together shortly after the invention of string (or perhaps before, if they had long hair). It can be done on a rope-making stand, a cardboard disk, a marudai, or just with your hands.
Weavers think of it as a way to create tassels and cords, weekend warriors think of it as a way to make tactical climbing rope, and one clever fellow recognized a completely different use, in a comment at the weaving link:
DIY Speaker cable leads. No I’m not kidding.
Weaving four insulated smaller wires in the B-A-A-B pattern results in an Interlaced Dual Twisted-Pair cable. In your example, white would be one twisted-pair, orange is the second twisted-pair. This weave pattern yields a cable of lower electrical resistance, while providing noise rejection that a single thicker wire doesn’t have. Key for high-current delivery and/or to low impedance speakers (exotics, cars). Also great when you only have smaller gauge wire than you want for your application.
...
To get the Interlaced Dual Twisted-Pair noise cancellation, once the weave is done, you cross connect the twisted pairs. Which means: join one white and one orange at one end, join the same two wires at the other end (continuity meter), then join the remaining white-orange wires together at each end. Run your positive/live through one of the new white-orange pair, and the negative/ground through the other.
Extra credit to the guy who built an oversized marudai out of tires to make a 12-strand climbing rope for Crossfit.
[Update: finally found the page I was looking for in The Ashley Book of Knots, where he describes both the finger-braiding method (#2999, 4-Strand Square Sinnet), and using a table (#3037, #3070) that’s basically identical to a marudai. Amusingly, where marudai braiders are extremely finicky about the smoothly-polished texture of the table’s surface, Ashley drives 1-inch brads into the edges to keep the strands neatly separated.]
Interlacements of Edo Yattsu
Having no real interest in hunting down an out-of-print, limited edition handmade book containing computer printouts, I wanted an alternative to Rosalie Nelson’s set of patterns for Edo Yattsu (often written “Edo Yatsu”, which really sounds more like “Tokyo Punk” than a braiding sequence).
So I wrote a script to generate them. Except that even after finding and excluding the color inversions, I had 26 compared to her 24. I’m pretty sure she excluded the two 180° rotations that are not also color inversions. If you’re braiding directly onto a loop, you may want the alternative versions.
Large collection of pattern GIFs below the fold, using the standard Carey diagram. When I get a chance, I’ll change the script to generate PDFs as well as GIFs.
This will make sense later...
7,8,9; 10,11; 23,24; 25,26. Dots to dot; shift, left over right; shift, right over left; reset. Repeat.

